0.- Overview #
Fork is a popular GUI (Graphical User Interface) client for Git, designed to make it easier for users to interact with Git repositories without needing to use command-line commands. It is widely appreciated for its user-friendly design, high performance, and rich feature set.
Key Features of Fork Git GUI
- Visual Repository Management: Fork allows users to visualize Git repositories, branches, commits, and more, providing a graphical representation of the repository’s history and structure.
- Commit Management: Users can easily view, create, and amend commits through an intuitive interface.
- Branch Management: Managing branches, merging, rebasing, and handling pull requests are simplified with Fork’s visual tools.
- Staging Area: Fork provides a clear staging area where users can drag and drop files to stage or unstage changes before committing.
- Conflict Resolution: It has built-in tools for resolving merge conflicts, making it easier to handle complex merges.
- Blame and History: Fork allows users to track who made specific changes in a file (blame) and navigate through the file history.
- Interactive Rebase: The interactive rebase feature helps users clean up commits and make changes to their commit history easily.
- Multiple Repository Management: It supports managing multiple repositories within the same window, allowing users to quickly switch between projects.
- Built-in Terminal: Fork includes an integrated terminal, so users can run Git commands manually if needed.
Fork is available on both Windows and macOS, and it’s often chosen by developers who prefer a more visual, intuitive experience over command-line interfaces for Git.
1.- Download & Installation #
We search for the official Fork page git-fork.com

Scrolling down we encounter two download buttons for Windows and Mac.
Although Fork is a 59.99$ one lifetime payment per license. We can evaluate Fork for an unlimited time as long as we use it for educational or non-profit causes.

We install the program as we would any other program
2.- Adding account #
Once installed we must add at least one git account. We will add a GitHub account using HTTPS / OAuth method.
On the superior menu we click “File > Accounts…”

A new popup window will appear, in here you can manage multiple git accounts. To add a new one, we click on the “+” button at the bottom left.

We choose our git hosting. In our case, GitHub

We type our GitHub username.
If you don’t know your GitHub username, go to the GitHub page and login. Click on your profile icon on the top right corner. Then click on “Your profile”. Your username will be in the URL: https://github.com/”Username“

When you click login, it will open your default web browser. Make sure that you login to your github account, and click “Authorise fork” when asked

If done correctly, the account will appear on your accounts list. Click on it, and check for the green “Online” status.

3.- Using Fork #
Using fork is very similar to Sourcetree, all the buttons have regular naming conventions and are easy to find.
3.1.- Cloning a repository #
3.1.1.- Any repository #
First we need to access our repository on our git hosting. In our case we will use GitHub.
Once in our repository, we go to the “Code” tab. In there we search for the “code” button. We will use the HTTPS method, copy the “.git” url.
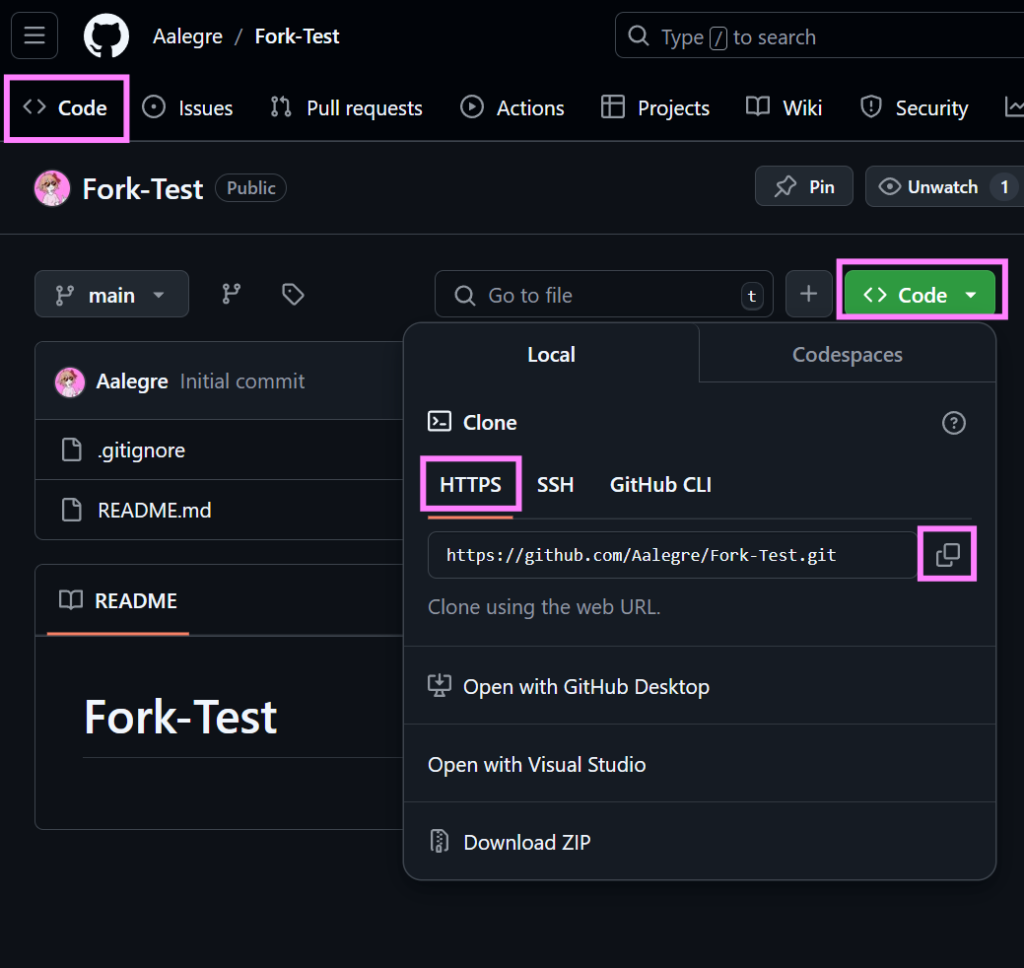
Using the top left menu on Fork, we open the cloning window “File > Clone…”
In here you will paste the url into the “Repository Url:” input box. Fork will autodetect if it’s using HTTPS or SSH. You can try the connection using the “Test Connection” button. Once fork has verified that it has connection to the repository, you can choose where to save the local repository.
DANGER!
Make sure that the location where you save your project is not inside a OneDrive or GoogleDrive folder (or similar). These services will remove files & break the project without warning.
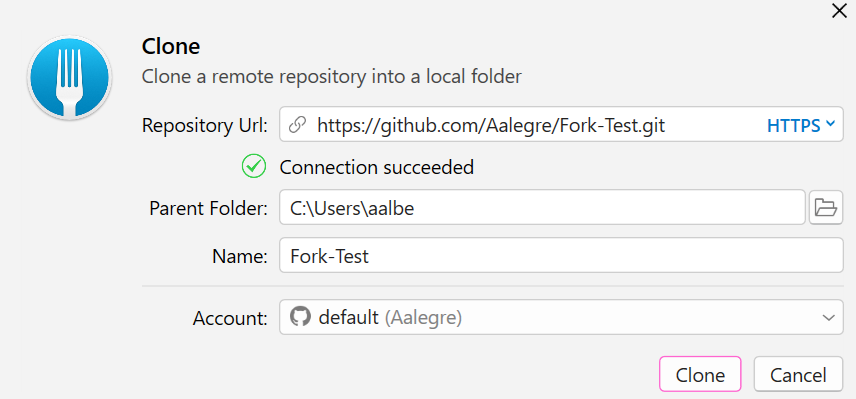
Once choosed a parent folder & a name, you can click “clone” and fork will start downloading the repository.
3.1.1.1.- Owned Repository #
It’s recommended to clone all repositories using the “3.1.1.- Any repository” method. But here you can check an alternative method.
First we must access to our accounts repositories from the accounts window.
On the superior menu we click “File > Accounts…”
We select our account. Click on the Repositories tab. Search for our repository, and click the download icon button on the right.

From here we follow the regular repository cloning instructions as listed on the “3.1.1.- Any repository” method.
3.1.2.- Switching between repositories #
Fork uses a (somewhat hidden) tab system to manage multiple local repositories. You can access the Repository Manager clicking on the “+” button on the top left.

This will open up a new tab with all the recent repositories opened by fork. You can open another one, selecting it on the left menu and clicking “open”. Then fork will add it as a new tab for easy access.

3.1.2.1.- Deleting a repository #
Closing these tabs does not delete the local repositories. Only hides them from the tab menu. To delete a repository you must go to the local windows folder and delete it as you would with any other folder.
3.2.- Downloading changes #
Before starting to work, and before doing any new commits it’s recommended to download any pending changes.
3.2.1.- Fetch #
Fetching download the latest information on the remote repository, without downloading any changes. This includes, new branches & new comits.
To fetch, you press the fetch button on the top left and wait for the status bar to complete the operation.

3.2.2.- Pull #
Pulling downloads the latest changes on your branch, previously retrieved by the fetch operation.
To pull, you press the pull button on the top left and wait for the status bar to complete the operation.

3.3.- Uploading changes #
Remember to download any pending changes before uploading anything.
3.3.1.- Commit #
Doing a commit, prepares your local changes in a “package”.
When doing any local changes, fork will track them on the “Local changes” tab, on the left. In here you will have 4 sections:
- Unstaged changes: Local changes that are not currently selected for “packaging” them in a commit.
- Staged changes: Local changes that will be included in the a commit.
To add changes to the commit, you must:- Select any file(s) or folder(s) that you wish to be included in the comit on the “Unstaged changes” area
- While selected, click on the “Stage” button. They will move from the “Unstaged” to the “Staged” area.
- Change preview: When selecting a single file, on the right side will apear a summary of the changes made.
- Commit actions: On the bottom right you will find the commit subject & button. Once you have staged all the changes & added a commit subject, you can press the commit button to package all the selected changes.


3.3.2.- Push #
After doing a commit, on the status bar will appear the number of commits pending to upload. To upload them, just press the push button on the top left.
