This guide shows how to read inputs directly in your scripts using the class generated by Generate C# Class/Script—no Player Input UnityEvents and no helper components. Just a simple and straightforward way of reading inputs using the new input system.
You can find a sample with inputs configured and a simple script for moving a 2D object here:
0.- What is the new input system? #
Unity’s Input System is a newer way to handle input from keyboard, mouse, gamepad, touch, and VR/AR. Instead of checking keys one by one, you first name what the player wants to do—like Move or Jump—and then connect those actions to the controls you want. All of this lives in a small settings file you can edit without changing your game code.
Core ideas (in simple terms)
- Input Actions asset (
.inputactions): A settings file that stores all your control setup. - Action Maps: Groups of actions (like
Player,UI, orVehicle). You can turn a whole map on or off at once. You can think of them like folders that contain a specific action group. - Actions: Things the player does (e.g.,
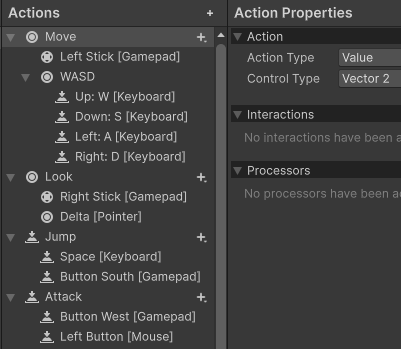
Move,Look,Jump). Actions have types:- Value: gives data like a direction (
Vector2) or a number (float). Useful for joysticks, triggers or directional input. - Button: pressed or not pressed.
- Pass‑Through (optional/advanced): sends the raw input without extra buffering.
- Value: gives data like a direction (
- Bindings: The actual controls that drive an action (like WASD or the Left Stick). You can add several bindings to the same action.
- Composites: Bindings made from parts, like a 2D Vector that combines W/A/S/D or a stick into one direction.
- Interactions: Rules for when an action counts, like Press, Hold, or Tap.
- Processors: Small filters that change the value, like Deadzone, Invert, or Scale.
- Control Schemes: Named device sets (like Keyboard&Mouse or Gamepad) that help the game switch devices and support rebinding.
Two ways you can use it
- Generated C# class (this guide): Click Generate C# Class on your asset to make a helper class (for example,
InputManager). In code, create it, enable the maps you need, then read values withReadValue<T>()or listen for action events (.started,.performed,.canceled). - Components (FYI):
Player InputandPlayer Input Manageruse UnityEvents and can handle local multiplayer. We’re not using them here, but they’re handy for no‑code setups.
0.1.- Prerequisites #
- Install the Input System: Window ▸ Package Manager ▸ Unity Registry ▸ Input System → Install.
- Activate it: Edit ▸ Project Settings ▸ Player ▸ Other Settings → Active Input Handling = Input System Package (New) (or Both if you must keep the old system).
- (Optional for UI) Ensure your scene has an EventSystem with InputSystemUIInputModule.
1.- Create an Input Actions asset #
On any folder of your project:
- Create: Right‑click ▸ Create ▸ Input Actions → name it (e.g.,
InputManager). - Open the asset and add an Action Map called Player.
- Add actions:
Move(Value ▸ Vector2)Look(Value ▸ Vector2)Jump(Button)Attack(Button)
- Add bindings (WASD/Left Stick for Move, Mouse Delta/Right Stick for Look, Space/A for Jump, Mouse Left/RT for Fire, etc.).
- Save the asset.
1.1.- Generate the C# class #
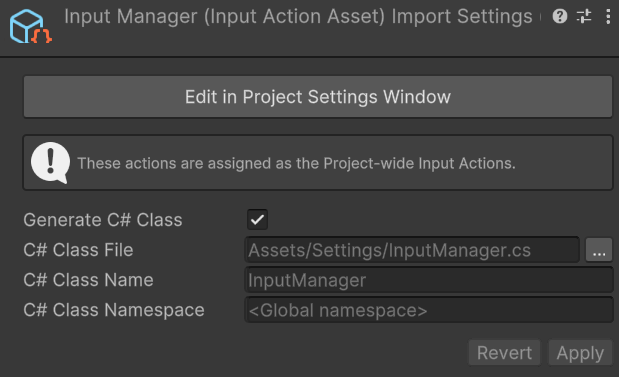
From the asset’s inspector or the Input Actions window menu, click Generate C# Class (a.k.a. Generate C# Script). Choose a filename (e.g., InputManager.cs).
2.- How to read inputs #
There are multiple ways on accessing inputs. This is the most simple way on how to access the input information.
- Add the library to the script:
using UnityEngine.InputSystem; - Create a variable to store the input actions c# class. In our case its named InputManger, make sure the name matches with yours:
InputManager input; - We enable the inputs on the start:
- Instantiate the input actions c# class:
input = new InputManager(); - Enable any action map that we might use, or enable them all:
input.Enable();
- Instantiate the input actions c# class:
using UnityEngine.InputSystem; // New Input System

public class UnityScript : MonoBehaviour
{
    private InputManager input; // generated InputSystem class (rename if yours differs)

    void Start()
    {
        input = new InputManager();
        input.Enable(); //Before accessing any input, we must enable the action map associated to it. You can do input.Enable(); to enable all action maps at once.
    }
}
2.1.- Read a button (Jump, Attack…) #
input.Player.Interact.IsPressed();
input.Player.Interact.WasPressedThisFrame();
input.Player.Interact.WasReleasedThisFrame();
2.2.- Read a Vector2 (Move, Look…) #
Vector2 direction = input.Player.Move.ReadValue<Vector2>();
Vector2 look = input.Player.Look.ReadValue<Vector2>();
3.- Read keys directly #
3.1.- Keyboard #
Keyboard.current.wKey.isPressed;
Keyboard.current.upArrowKey.wasPressedThisFrame;
3.2.- Mouse #
https://docs.unity3d.com/Packages/com.unity.inputsystem@1.14/api/UnityEngine.InputSystem.Mouse.html
Mouse.current.delta.ReadValue();
Mouse.current.position.ReadValue();
Mouse.current.leftButton.isPressed;
Mouse.current.rightButton.wasPressedThisFrame;
3.3.- GamePad #
Gamepad.current.aButton.wasReleasedThisFrame;
Gamepad.current.leftStick.ReadValue();